Adding VLAN Interfaces in pfSense
Next, the LAN (local area network) port facing pfSense and connecting to the switch must be a trunk because it will carry all traffic including VLAN10 and VLAN20 on one cable. On the pfSense side, the LAN NIC (network interface controller) is just the physical parent interface (the actual LAN port you plug the Ethernet cable into); VLANs (virtual local area networks) are created on top of it.
Log into your pfSense Web Dashboard using the web browser. From the top menu select Interfaces and then from the drop down menu click on Assignments.
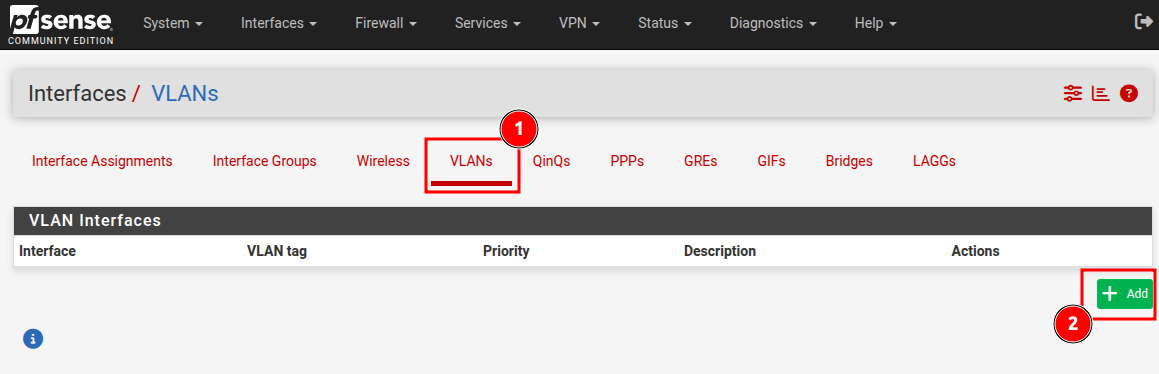
- VLANs
- Add
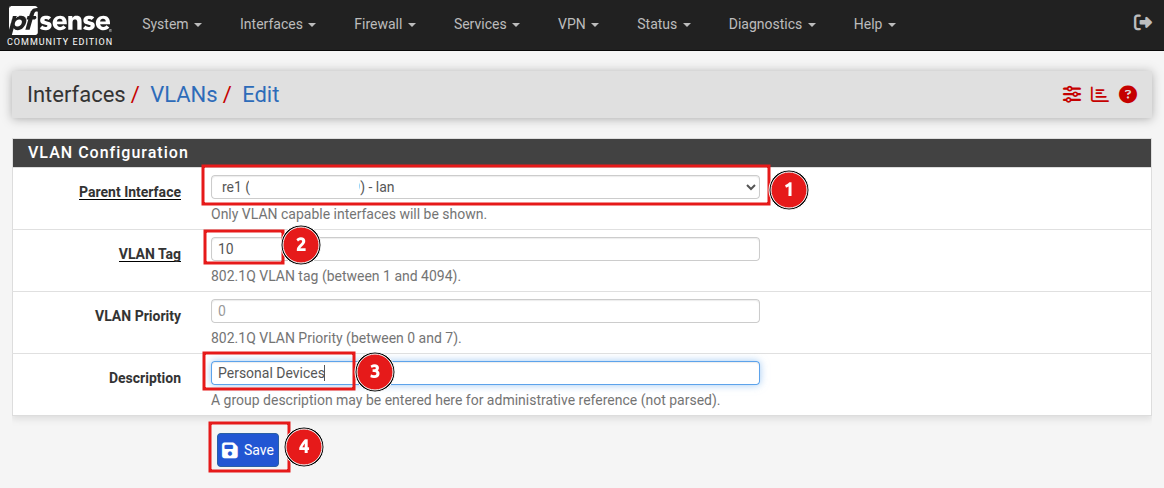
- Ensure your LAN port is selected, in my case re1 but your may be different, however it will say lan at the end
- For VLAN Tag use
10 - For Description I used
Personal Devicesas I will used it for personal devices like Laptops, PCs, tablets, etc. - Make sure to click Save
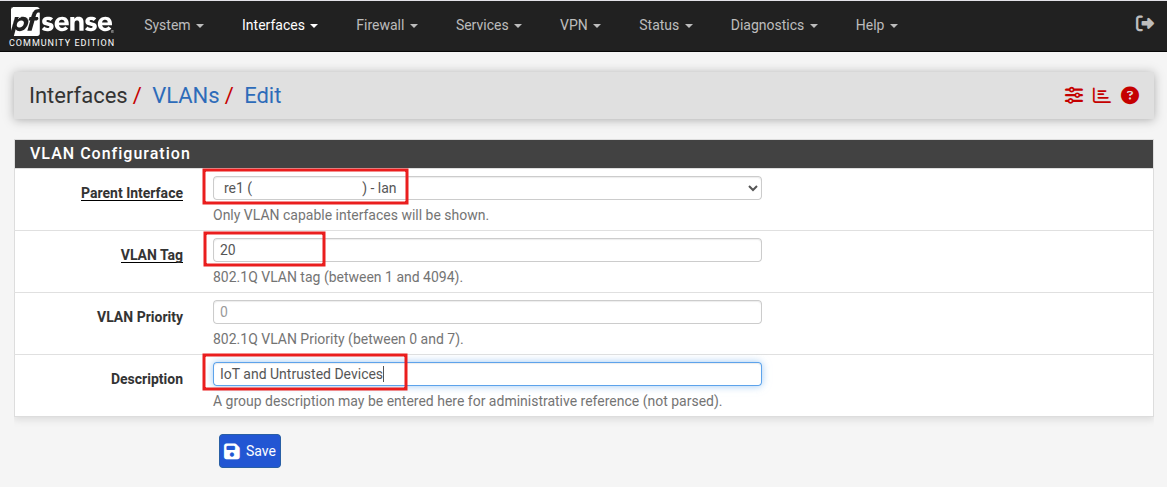
Repeat the process for IoT and Untrusted Devices VLAN but use 20 for VLAN Tag.
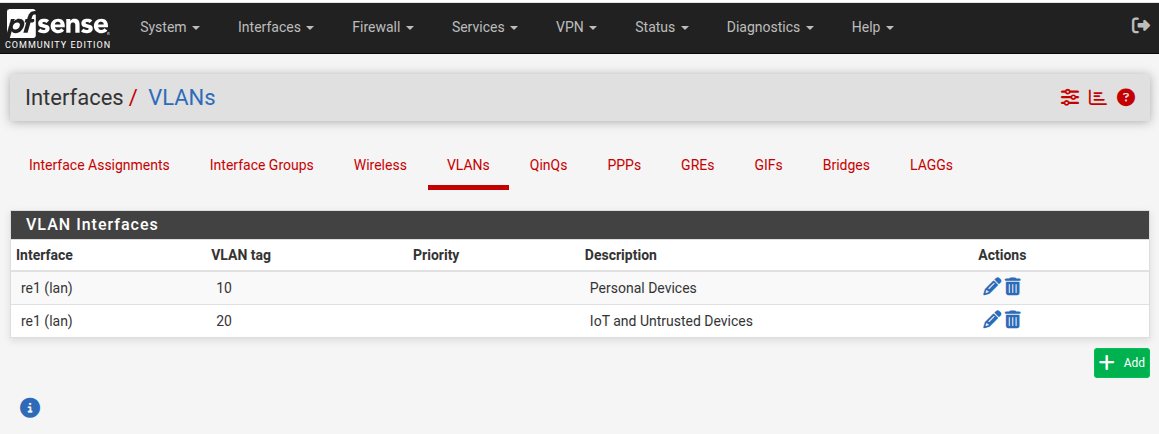
You should have the following list of interfaces for your VLANs:
We now need to assign the VLANs to an Interface.
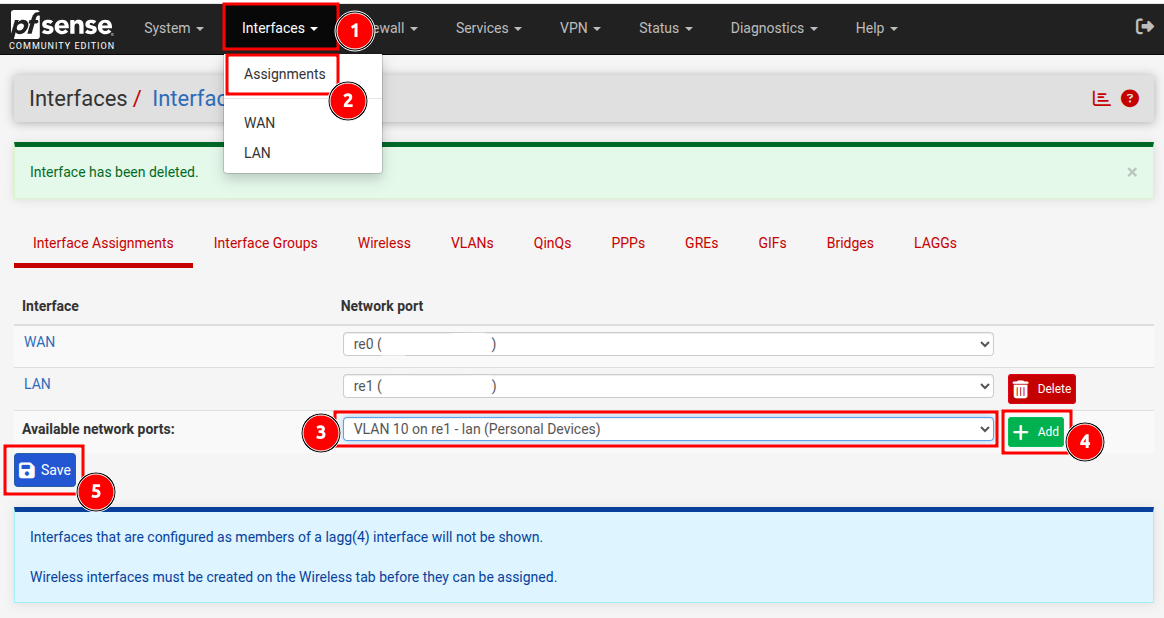
- Select Interfaces on the top menu
- Click on Assignments from the drop-down menu
- Select VLAN 10 on re1 - lan (yours may have something different than re1 in the name)
- Click Add and repeat for VLAN20 but select VLAN 20 on re1 - lan
- Click Save
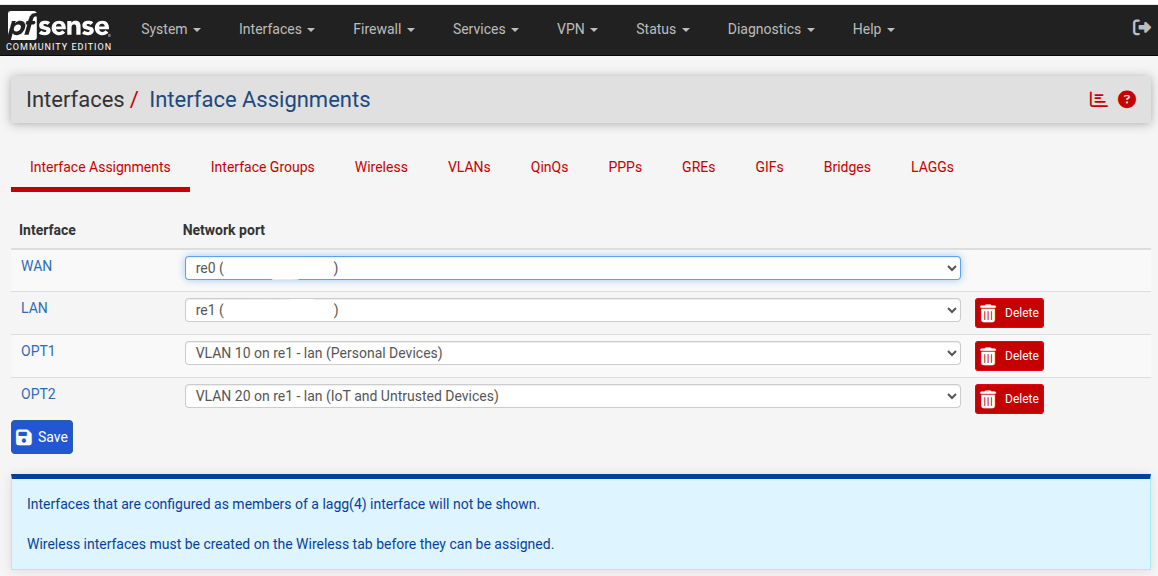
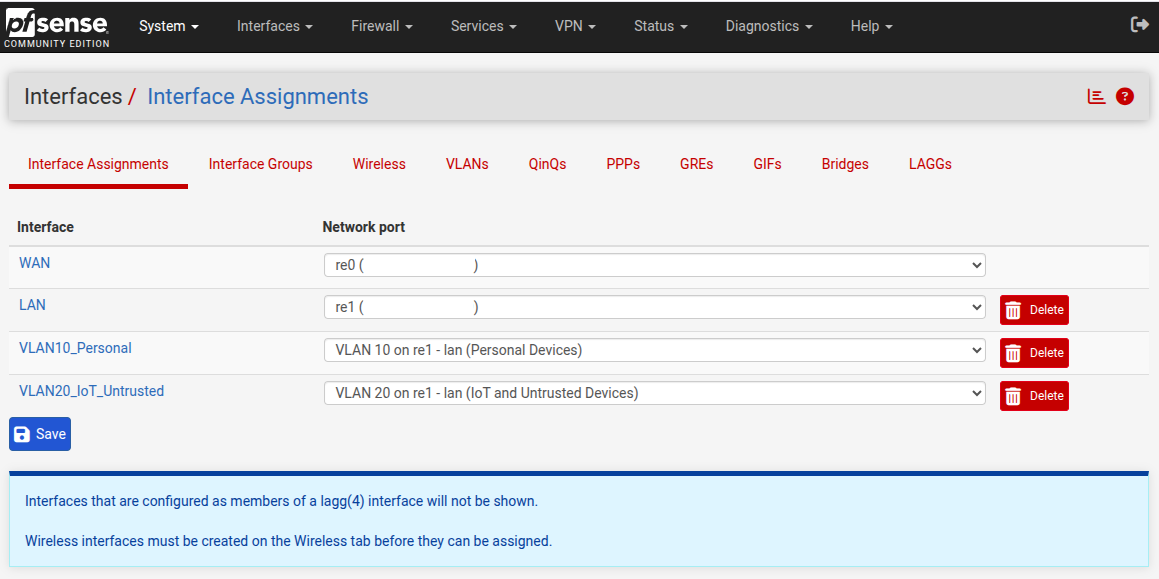
Your Interfaces should now look something like this:
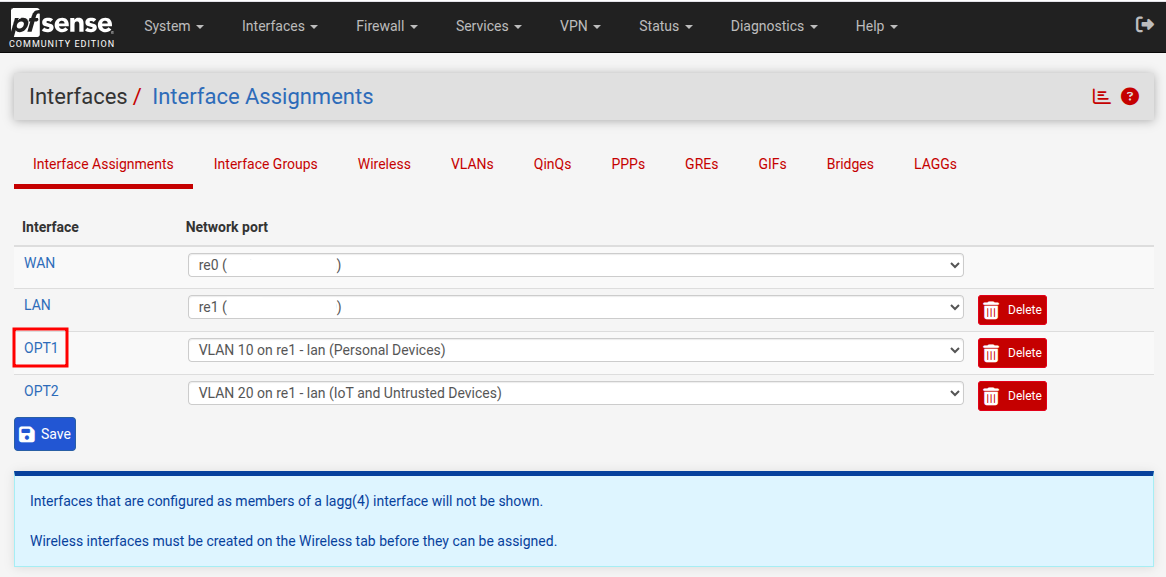
You can modify the interface name by actually clicking on the name:
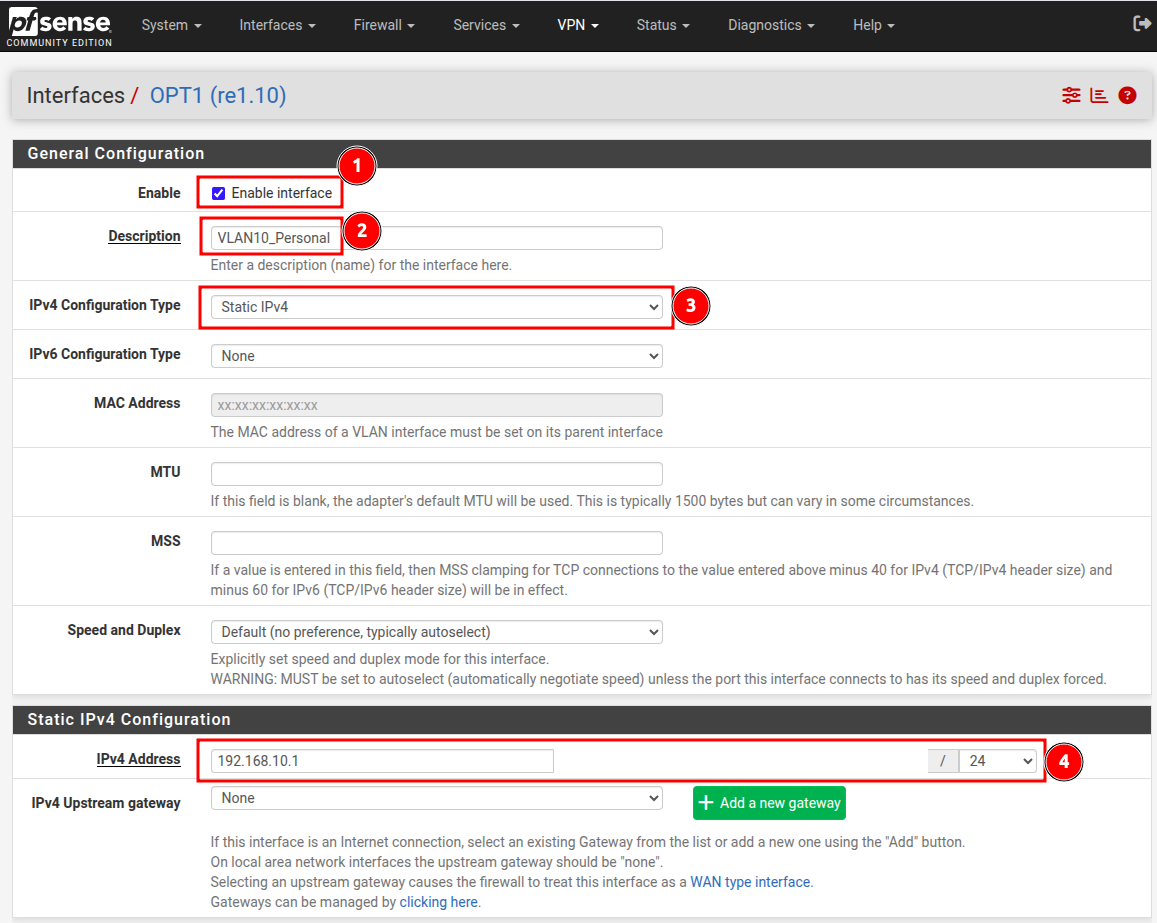
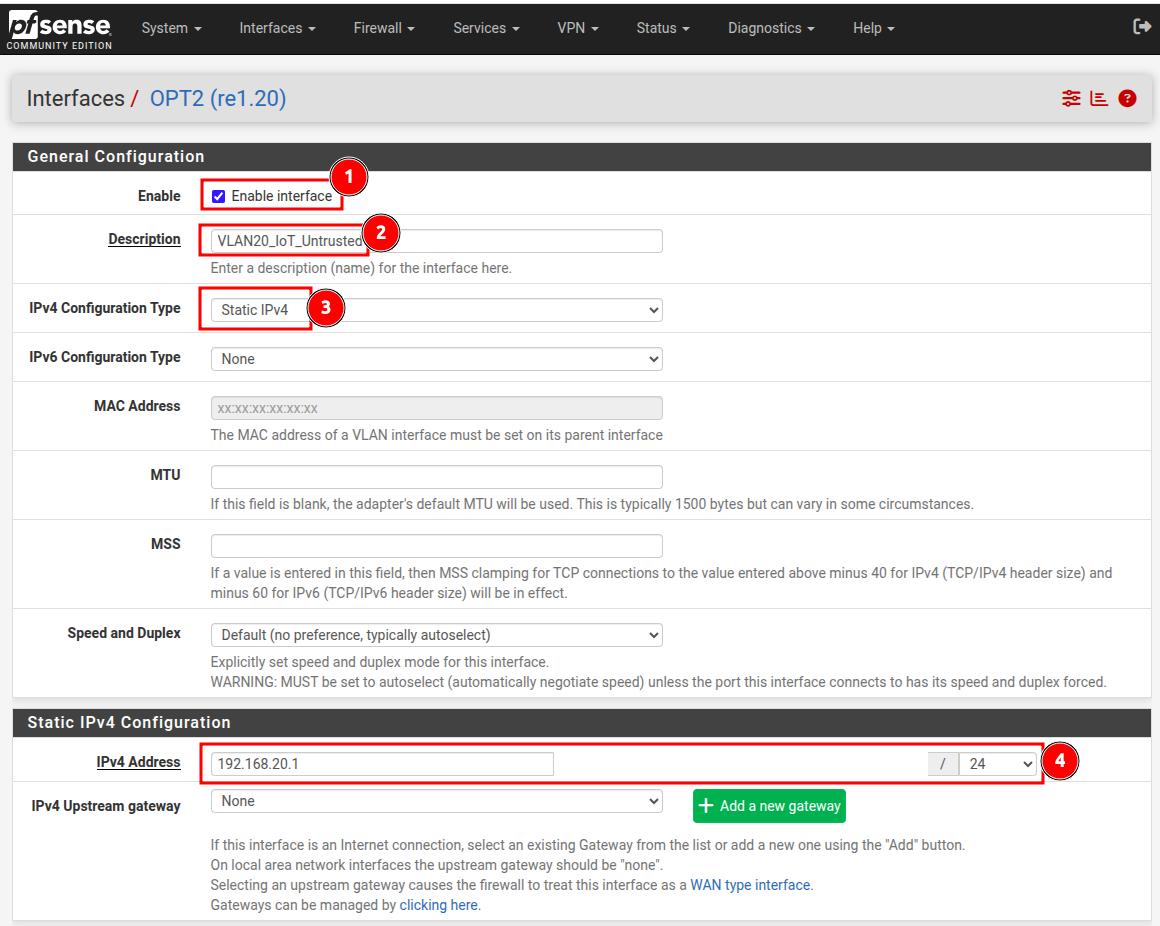
- Make sure Enabled box is checked
- Change the Description to be relevant, I used
VLAN10_Personal - For IPv4 Configuration Type select Static IPv4
- For IPv4 Address use
192.168.10.1/24(up to 253 devices can connect)
Click Save.
The page will refresh and you will see:
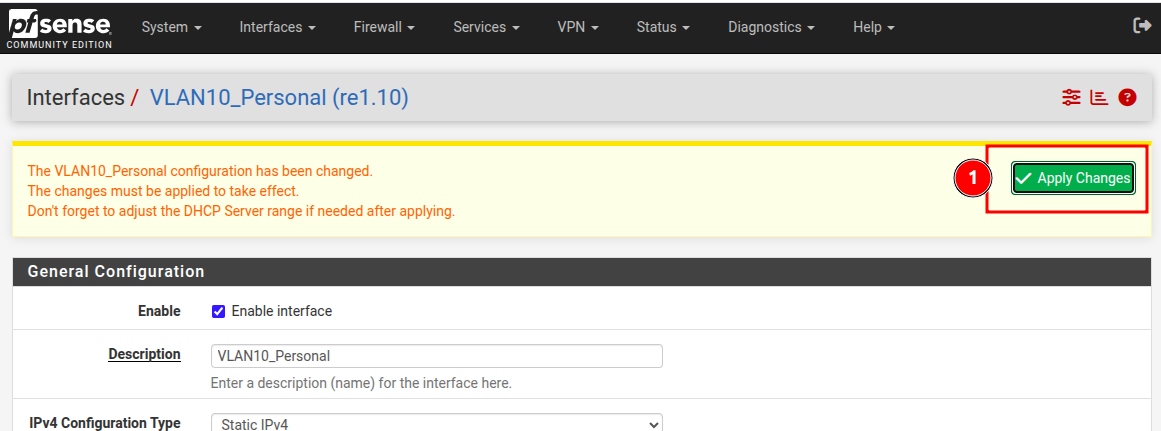
Click Apply Changes.
Repeat the steps for VLAN20 but use 192.168.20.1/24 in the last step and click Save.
Your Interface Assignments page should look something like this:
Activating DHCP (Dynamic Host Configuration Protocol) on the Network
We now also need to make sure we have DHCP set up in pfSense that will handle handing out IP addresses on our network when devices connect.
From the top menu select System and then click on Advanced from the drop down menu.
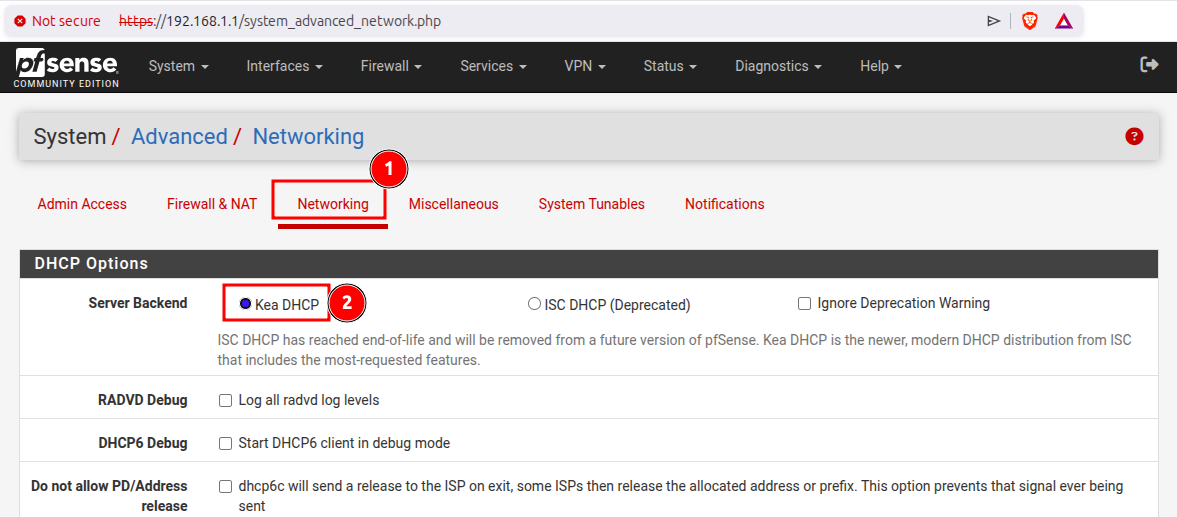
- Click Networking
- Select Kea DHCP
You can leave all the other options for now as default, scroll down and click Save.
Next, you need to activate it. In the top menu, click on Services and then DHCP Server from the drop down menu.
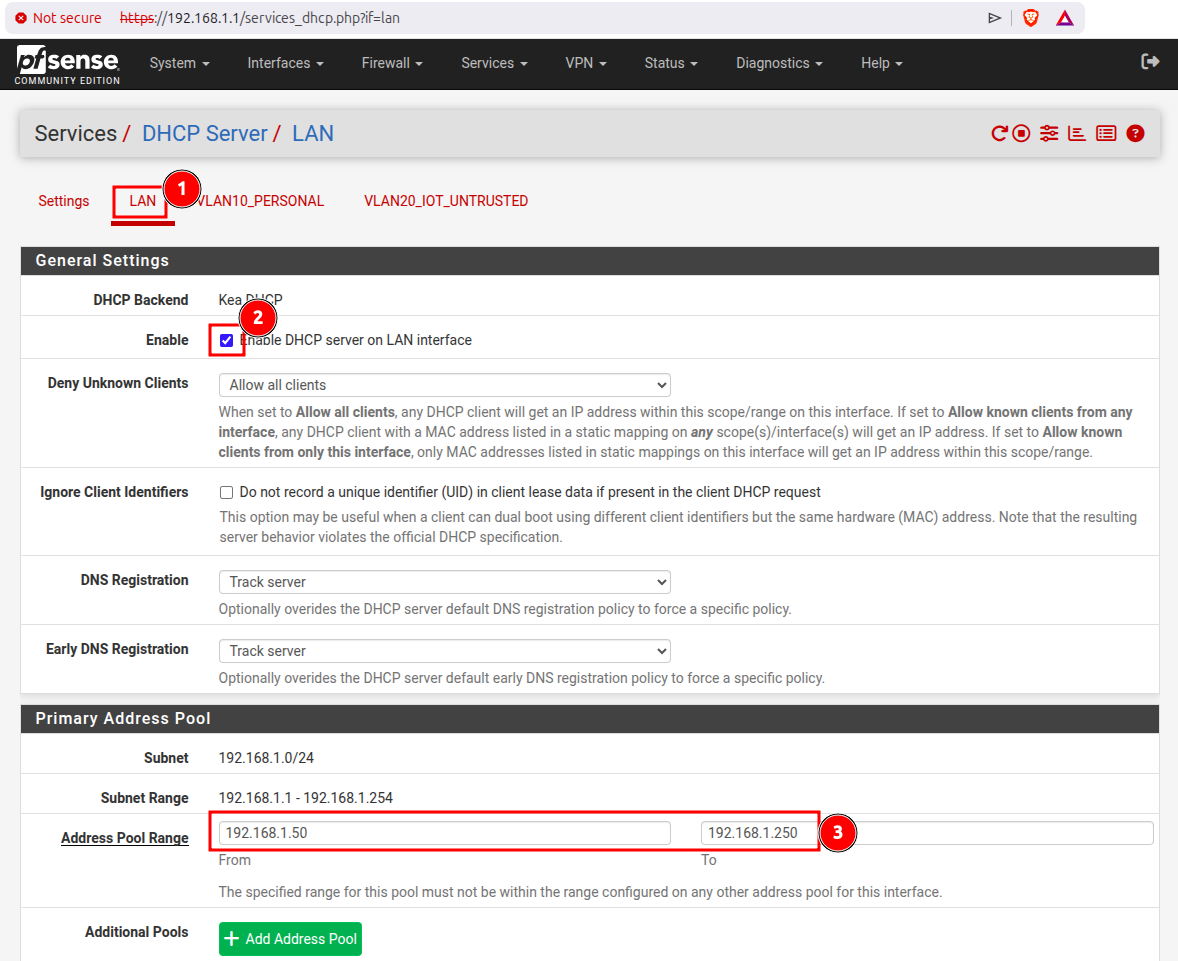
- Click on LAN
- Make sure Enable checkbox is checked
- You can leave the default values or adjust them as I’ve done (this means when a device joins 192.168.1.0/24 network, the DHCP server will assign it an IP address within the range specified)
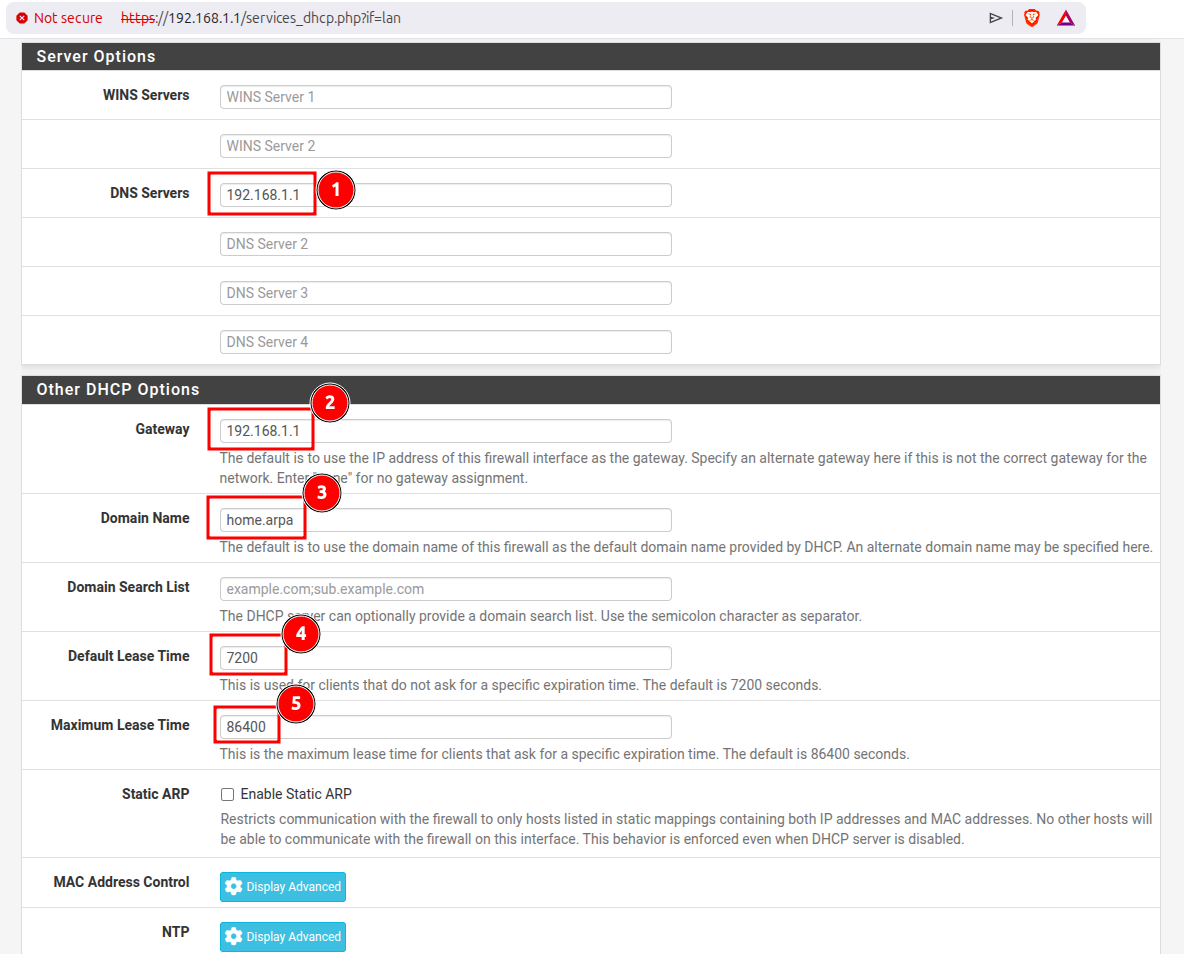
- Set DNS Servers as
192.168.1.1 - Set Gateway as
192.168.1.1 - Use the default name for Domain Name (yours might be different, it’s pre-filled in light gray letters)
- Use the default Default Lease Time
- Use the default Maximum Lease Time
You can leave everything else at default, scroll down and click Save.
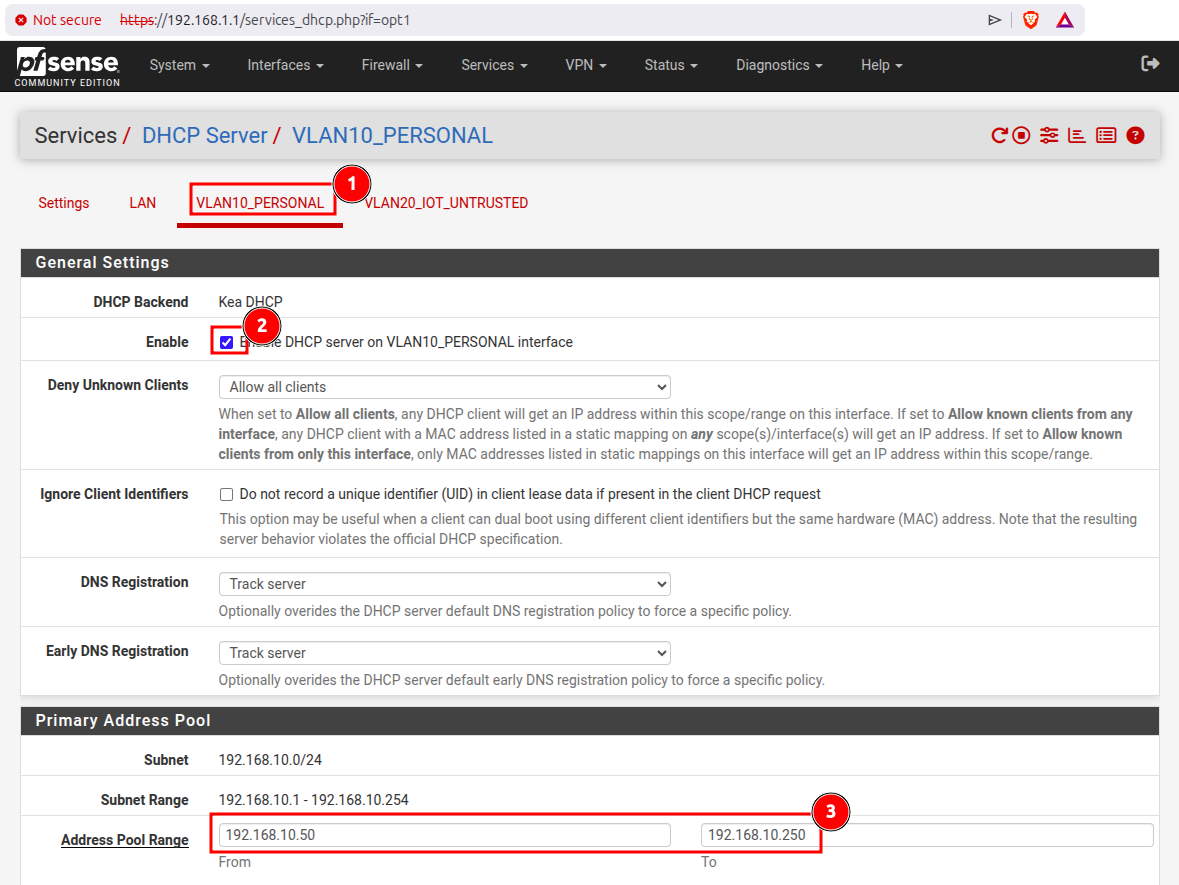
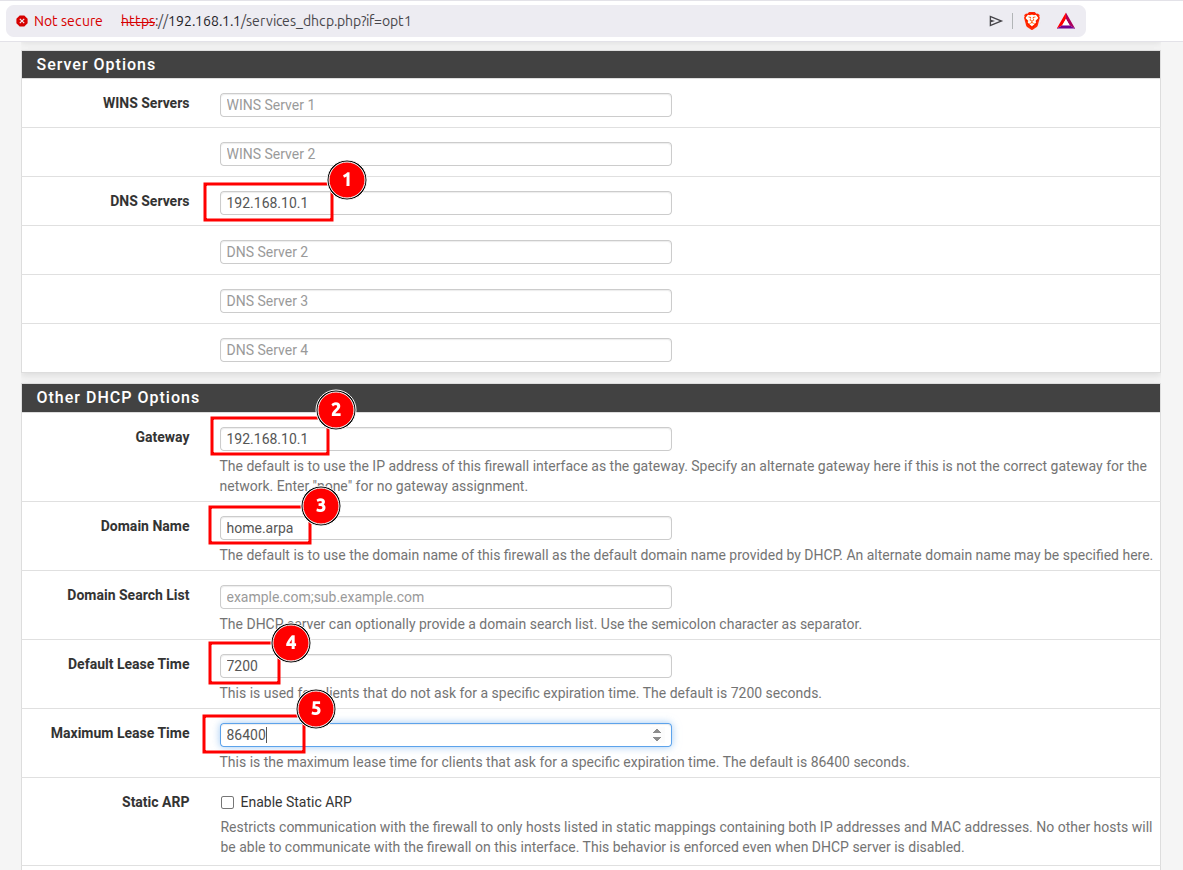
Repeat the steps for VLAN10_PERSONAL but make sure to use 192.168.10.1 for your DNS Servers and Gateway.
Do the same with VLAN20_IOT_UNTRUSTED settings, just remember to use IP addresses that start with 192.168.20.x.
Backup and Restore of your pfSense Configuration
At this point, we’re done with the pfSense web console configuration settings and will be moving on to set up the switch. To be on the safe side and to avoid repeating all the work we’ve done so far, it’s recommended that you do a backup of all your settings on pfSense.
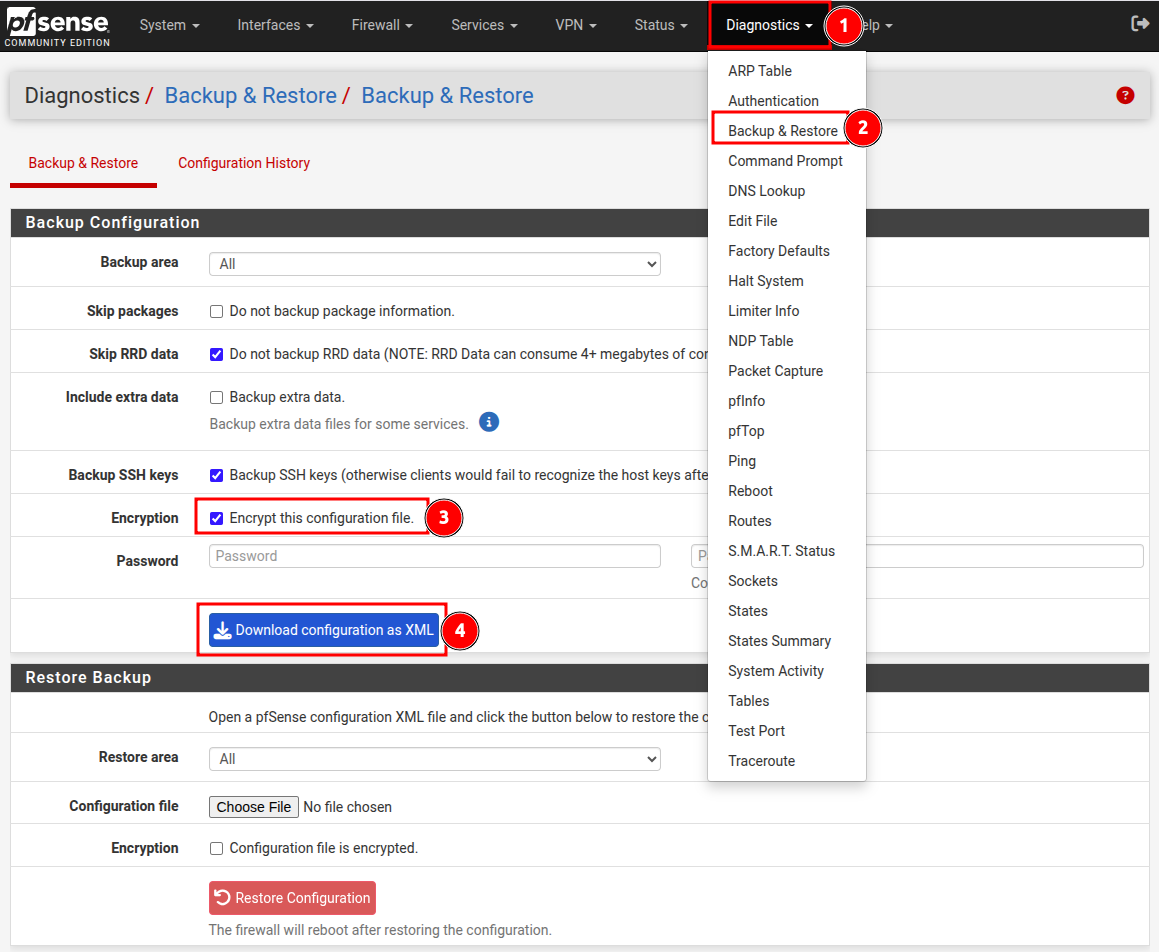
- Click Diagnostics
- From drop-down menu select Backup & Restore
- Encryption is highly recommended, remember to use your password manager
- Download the file
I recommend the tried and true 3-2-1 backup strategy. Three copies of your data, on 2 different storage media, one stored off-site. I have 1 on my Admin_Device hard drive, 1 on a USB, and 1 uploaded to a secure cloud storage service I trust (Proton Drive).
In the screenshot above, you can see where you are able to upload your backup file to restore your configuration settings.
Next, we will add our switch and wireless access points.