The Network Sprawl Problem for Small Businesses
Let’s say you have a small business that has internet connection. Chances are you got a modem from your ISP and as you acquire devices (printers, projectors, security cameras, etc) for your business or services (Guest WiFi for example) you simply add them to your network and it’s business as usual.
What if a device gets compromised by someone? Well, they can actually use that device to see your entire network and attempt to exploit, attack, or compromise any other devices on that network. What if a hacker logs on to your Guest WiFi? Every device on your network is now accessible to them.
This is how easily and quickly ransomware can spread in a small business or confidential data stolen, because computers and other devices are constantly communicating between one another through networking devices like routers, switches, and wireless access points and can spread the infection.

In the above network, even though guests will connect to a separate Guest WiFi SSID (Service Set Identifier), they have access to the main router, which allows them to possibly compromise it and then compromise the entire network.
There is also danger of having IoT devices on a same network as trusted devices. IoT (internet of things or smart devices such as thermostats, security cameras, even coffee makers or any such devices that connect to a network and therefore have ability to connect to the internet) typically don’t have the processing power or storage to integrate high levels of security and have a much higher chance of being vulnerable to be exploited remotely.
The answer is to separate the network to improve security, minimize damage in event of compromise, and increase resilience.
Network Segmentation
Compare the earlier network diagram to the one below:
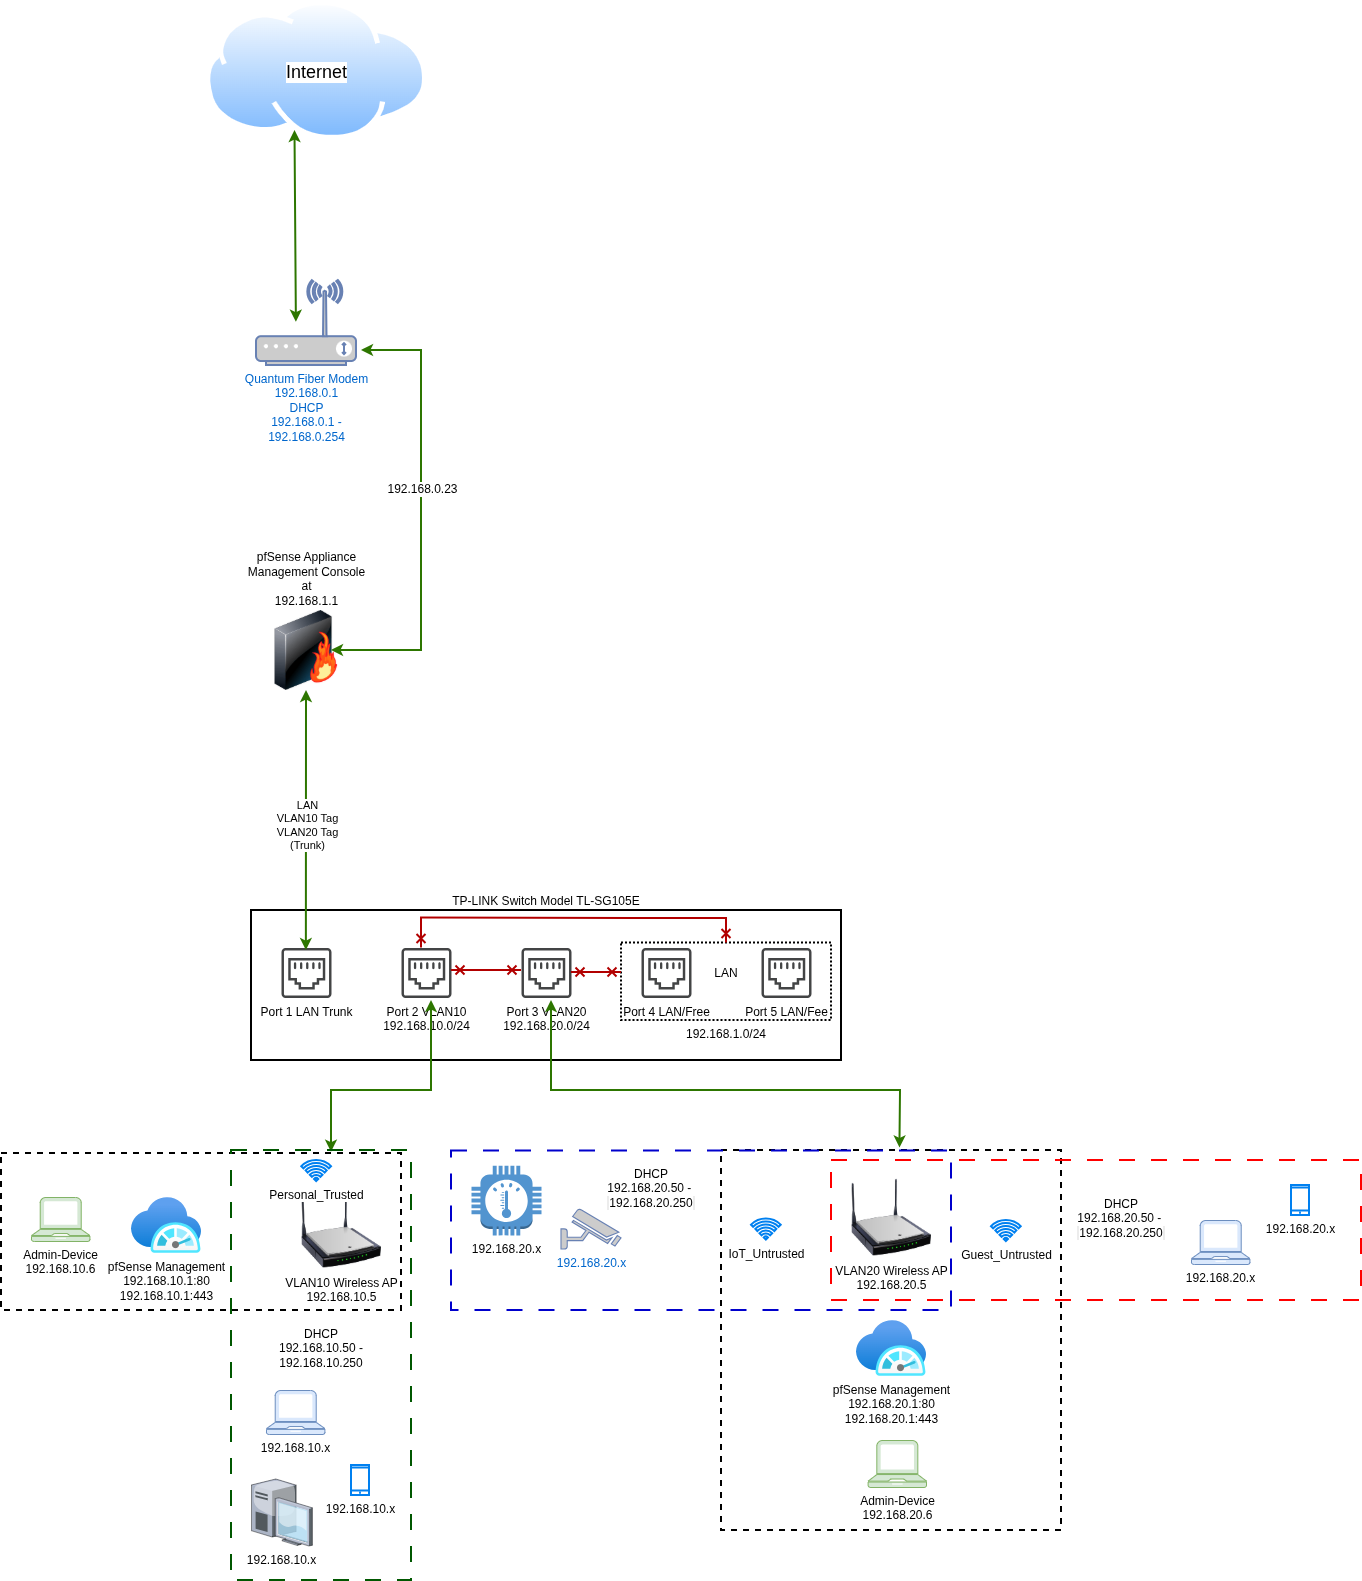
This seems extremely complicated but is very simple and powerful.
- Internet traffic comes in on ISP modem and if it came from our network sitting behind the pfSense firewall, it get’s routed to pfSense, which handles distributing the traffic to specific ports that are on the switch.
- Traffic only gets past the firewall if the request for that traffic originated from the LAN/VLAN10/VLAN20 side of the firewall, otherwise the traffic is blocked.
- Anyone connected to Port 4 or Port 5 (LAN) on the switch can’t access any devices connected to VLAN10 or VLAN20 (see the red blocked traffic lines).
- Anyone connected to one of the VLANs is not able to connect to either the LAN or the other VLAN network.
- When connected to a VLAN on any device except the Admin Device, the user will be given an IP address ending between .50 and .250 range. Any HTTP or HTTPS connections from those devices to the firewall management webGUI on the VLAN are blocked to prevent them from tampering with the firewall settings.
- A specifc Admin device will be used to manage firewall on either VLAN connection to avoid having to do a hardwired connection into Port 4 or Port 5 of the switch (to be even more paranoid and secure, we can remove that ability from VLAN20 so that no device can access pfSense on VLAN20).
Advice on Equipment and Software
This set up will need the following equipment beyond the ISP provided equipment:
- Main laptop/PC
- Micro PC with with 2 RJ45 (Ethernet) connectors
- At least a 5 port switch
- 2 Wireless Access Points
Main Laptop/PC
Your main laptop/PC doesn’t have to be anything fancy or super expensive. It will be used as the main Admin_Device for this setup. Word of advice, attempt to have a device that has at least 16G of RAM or more. If you have only 8G of RAM and running Windows, your hardware will struggle having too many windows or browser tabs open. For example, having 13 web browser windows open uses at least 5G or more of RAM. So if you notice your system freezing up, you may need to close applications and/or close web browser windows/tabs.
I personally use Ubuntu 24.04.4 LTS (Long Term Support) for my Admin_Device but if you prefer to stick to Windows, just be aware how to get to your Network Connection Settings and change the setting from Automatic (DHCP) to Manual or Static.
ISP Modem/Equipment
If you are using your ISP’s modem/equipment, pay attention to the maximum speeds supported. My ISP modem has two 1G ports and two 10G ports. This means even if all other equipment supports speeds over 10G, when it comes to my connection to the internet, it will never exceed 10G speeds in total because my modem caps out at that speed.
My ISP has the following provided equipment:
- Quantum Fiber Modem Q1000K ISP modem
- Quantum Fiber WiFi 7 access point model W1700K
The modem and WiFi access point should have a network of 192.168.0.0/24 (this means any devices that connect to the network will have an IP address issued to the beween 192.168.0.2 and 192.168.0.254.
Your equpment will obviously vary. But if you have not done so already, I would highly recommend you log into your ISP modem/router web interface and change the default admin password as well as the default passwords for the WiFi networks that it broadcasts. Most of the time the web interface can be accessed once you connect to your network and typing the the IP address of the “Gateway”.
If you’re using a Linux device, simply bring up a terminal and use ip route command. You should see your gateway IP address at the
very beginning where it will say default via ... and the IP address shown is your gateway.
If you’re using Windows device, simply bring up a Command Prompt window and run ipconfig command. The very last line of the
network interface that has internet connection will have a line for “Default Gateway”.
Once you have your network up and running, I would recommend that you log into your ISP modem/router interface and disable the wireless SSID that way devices will be forced to connect to the wireless access points you have configured behind the firewall.
Mini PC/Firewall Hardware
You can purchase a pfSense appliance directly from Netgate. Be aware that it will come with pfSense+ version that can’t be downgraded, running you at least $129/year. Or you can follow along and install the open source free version on a mini PC.
When choosing your mini PC to install pfSense on there are some recommendations:
- Dual RJ45 ports is required (may also say 2 RJ45 or 2 Ethernet ports)
- 4G+ RAM (attempt to choose one that is upgradeable/removable versus soldred in case it needs replacing in the future)
- 128G+ NVMe SSD hard drive
You will find plenty of mini PC’s under $300 that will meet the above criteria on Amazon or AliExpress. Mine cost me $135 on Amazon 3 years ago. Unfortunately, the prices have gone up due to cost of RAM and SSD storage.
Switch
You have plenty of options here as well but you need to make sure to stay away from ones that specifically say “Unmanaged” in the description.
I’m specifically using TP-Link 5-Port Gigabit Ethernet Easy Smart Switch model TL-SG105E ($25-$45 on Amazon depending on sales). Some of the most important things to look for in the one you choose:
- At least 5 ports
- Ability to manage switch
- Supports VLANs (I have yet to come across unmanaged switches that support VLANs)
- Port mirroring/Network monitoring feature preferrable but not required
Wireless Access Points
While many routers can be put into Wireless Access Point mode, I personally prefer devices that are designed for specific purpose as they tend to excell in performance at their specific function versus multifunction devices that may have average performance across their multiple functions.
I’m specifically using 2 TP-Link 5-Port Gigabit Ethernet Easy Smart Switch model TL-SG105E ($25-$45 on Amazon).
Ethernet Cables
When connecting your equipment using Ethernet cables, you need to be aware of what type of cables you’re using. For example, if you connect your mini PC with pfSense to your 10G (10 Gps or 10 Gigabytes per second) port on the modem using a CAT 5 Ethernet cable, you are not going to get those speeds as CAT 5 is only rated to be guaranteed at 100 Mbps (100 Megabytes per second) and up to 1 Gbs under ideal conditions. My recommendation is to use CAT 5 Ethernet cables you probably have on hand to do the initial setup and testing, and then once you know the lengths of cables you need for your set up, replace them all with CAT 6, CAT 7, or CAT 8 Ethernet as they will support up to 10 Gbps speeds (for cable lengths of up to 120 ft for CAT 6 and longer distance for CAT 7) and 25 Gps for CAT 8. This way if you end up upgrading your equipment later you don’t have to worry about buying new cables.